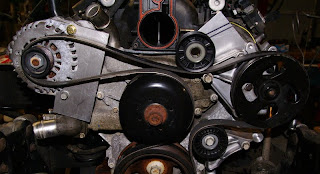
 Last week I received the CTS accessory brackets from Team Chevrolet, and got some aluminum plate and block at Sackin Metal Recycling in Huntington Beach. The CTS bracket will work for the power steering pump. Because of truck accessories, the brackets need to be spaced out from the block an inch. I've got a solid block behind the power steering bracket to bring it in line. I'll trim and lighten the bracket after I figure out where the idler will sit to bring the belt below the throttle body. It started as a 4 lb block, and is probably around 3 lbs now. The alternator will work on the passenger head. I'm using some 5/16 plate to make the mounting bracket. The lower alternator bracket bolts into one hole on the water pump, and will be triangulated with two other holes. The rear bracket catches two of the holes, and the front will catch all three. I still need to drill the front hole for the common bolt for front and rear, and make a 2" spacer to join the plates, and need to make a 7/8" spacer and locate the final hole on the front plate.
Here's the CTS alternator bracket. Unfortunately the steering shaft runs right through the middle of the alternator. I'll use it to mount an idler and tensioner.


