Sunday, April 3, 2011

Time to Hustle

With the progress at the bodyshop, it's time to go into high gear at home. I ordered most of what I need for reassembly from Corvette Central. It's been like Christmas around here for the past month, at least for me, with UPS delivering a few times a week. I also ordered the hushpower mufflers and mandrel bends to put the new exhaust on the car. I've got a fabricator coming by the house to size up the job.

With my wife back in South Carolina at her sister's this weekend, it was a car weekend. Hit the local parts store to order a new power steering rack and pump. It will be in later this week. With that on order, I put my attention on the front end. Prior to the move I couldn't find the lowering blocks for the front spring, so I never pulled the spring when I had the control arms off. I also hadn't gotten the front shocks, so I ordered those up with the mufflers.

Saturday was mostly disassembly, and modifying the spring. I pulled the spring and took the sawzall to the thick rubber blocks on the top, then took the rest of the rubber off with a razor blade, and cleaned it up with a sanding disk on an angle grinder.


On top of the spring you can see the new angled wedge, gooped up with lithium grease. 
Installing the shocks was challenging - with little weight on the chassis, the suspension isn't settling much, so I had to get creative. 


 Here's my creativity - one of my pipe clamps between the bottom of the lift crossbeam, and the top of the radiator mount. One and a half inches of tightening, and the shocks finally fit. 


Here's the left side buttoned up except for the steering rack. Lost a half hour looking for the shock bolts. After several boxes, finally found the bolts and the sway bar end links in a box on my bench that I moved the brake calipers in. Note to self - don't move with a car in a thousand pieces.


Here's the right side in the same state. I can probably put the grease fittings in the lower control arm now - shouldn't have to set the ball joints on blocks any more now that things are reassembled. 

Aprilish

That's what's written on the board at the shop - Mutt will be painted Aprilish. Well now it's April, and I have a painted hardtop in the stock Ermine white, the same color the coves will be painted. That's the only stock color going on the body or in the interior. The body will be Victory Red, not Crystal Red. Crystal Red is a metallic color used on C6 Corvettes. It's also unobtainable today, due to the horrific earthquake and tsunami in Japan last month. From the Wall Street Journal "The pigment is called Xirallic and is only produced at an Onahama plant owned by Merck KGaA, a German chemical company. Onahama is a town on the Japanese coast where citizens are still struggling to recover from the devastating earthquake and tsunami that struck Japan earlier this month. In the wake of the tsunami, the town has been exposed to the radiation leaking from the Fukashima nuclear reactor."

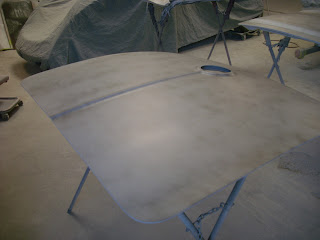
Here's the hardtop after it was painted. It's now home, along with a pile full of parts from Corvette Central to put it back together - new headliner, new gaskets, new side and rear plexiglass, new hardware.


 The underside of the hood. Ron modified it to ensure there's plenty of room for the power booster. I didn't swap to a hydraulic booster, so make sure there's plenty of room. 


 Here's Ron and Jason shooting the second round of primer on the car. In front of the car are a number of other panels from the car. To the left of the paint booth there's a bunch of banners on the wall. On Tuesdays, the 1941 Willys under the car cover comes out for the filming of Cut, Chop and Rebuild for the Speed Channel. Mutt may get a cameo after she's in color.


Mutt

Trunk lid ready for final sanding before color. 


Same for the hood.  


And the deck lid. There's a second deck lid somewhere in the shop. The other one goes with the rollbar. 


Nose of the car after second round of priming. The black guide coat will help Ron see any low spots.


The rear quarter after Ron started blocking. Goal was to block the car, pull the doors, then prime the jambs. 


Ron Priming the trunk, jambs and center console. The car is all primed except for the engine bay. 


The small parts are also getting ready for paint. Here's the cowl vent, gas door and glovebox - the only steel parts on the body. The potmetal headlight trim rings don't count. 

Thursday, January 20, 2011

Sitting in the Sun

Mid Seventies today in Huntington Beach, and Mutt's body is outside getting some sunshine to help the primer dry.


Wednesday, January 19, 2011

In Primer

Today, Mutt went into primer. The entire car - minus the hood is all grey primer. This is the first time the body has been all one color in over a decade. It's the BGA look - hood still in gelcoat, like BIGMOUS was for years. Actually, it will be primed as soon as the bottom is clearanced for the power brake booster. 

Last week there were a number of final body adjustments. Since the body is basically glued together, and there's no shims to adjust, when things don't fit, the panels must be modified. Here, some glass is built up on the nose to blend better into the hood, and close the hood to nose gap in the front. 

After bringing the body back in alignment and glazing the work, the body was ready for primer.

The guys also glued in the radiator baffle earlier this month.

 Jason and Ron shooting the primer. The color will go on in the paint booth.

Passenger side sitting in primer.

 Nose in primer. First time the lower valence has seen any paint.

Rear of the car all primed.

 And the driver's side.


Monday, January 17, 2011

Gifts from Others

In preparing the body, there's been past presents that have significantly contributed to the effort and cost of the work. One of these areas was the absolutely horrific soda blasting job, which caused thousands of dollars of panel replacement and extra work. A second was over a hundred holes drilled into the convertible top lid and lip on the body, probably for a tonneau cover. Most of these were filled with Vette Bond.


Glazing putty over the entire deck lid

The cover with the first coat of primer.

Vette Bond filling the corresponding holes in the drip rail on the convertible top compartment.

Gas tank cover cleaned up and in primer.

The hardtop was one of the few positive areas on the body. No real repair was needed on the hardtop.

The hardtop being block sanded.

The hardtop primed and blocked at 150. A couple low spots on the front still.

Bonding and Blending Rear Fenders

Right before the New Year, the shop bonded the rear fenders to the body. Here's the right fender bonded to the car and some Vette Bond blending in the seam. 

Same on the left fender. The jog around the gas door can be seen here.

Passenger fender nearly finished, with glazing putty over the fender.

Same on the driver's fender, at the glazing putty stage. 

Shot of the rear of the car with the fenders glazed.

Looking at the right top of the passenger fender, with trunk lid and deck lid in place.

Same shot of the driver's side of the car.

Rear Fenders & body clean-up

Over the past couple month, as I've been settling in the new house and setting up the garage, Chris and Ron have been cranking along on the body. Prior to Christmas, Ron was finishing up fitting the left rear fender. Here's Ron zipping off the old left rear fender.


In fitting the new rear fenders, Ron did not want to disturb the gas door, so fitted the new fender around the the gas door.

Here's the fender with the midyear bonding strip in place, and the old fender nearly fitted up for the new flared fender.

While Ron was working this, Chris was working the front end of the car. Passenger side needed quite a bit of vette bond and glaze to clean things up, along with a bit of fiberglass work.

More glaze cleaning up the passenger front fender.

Lower fender caught a cone below the cove at one point autocrossing.

Here's the cove repaired and awaiting the vette bond to be sanded out.

The shop is taking time to make sure all the bolt-on parts such as headlight buckets align well with the fiberglass. Here Vette bond is being used to build up the headlight ring to get a nice transition across the seam.

The media blaster blew some holes in the driver's door jamb that needed to be repaired.

Here's the jamb after clean-up.